How to Install a Kitchen Faucet?

How to Install a Kitchen Faucet? If you’re like most people, your kitchen is one of the most used rooms in your home. That’s why it’s important to have a kitchen faucet that meets your needs and fits your style. Whether you’re looking for a new faucet to replace an old one or you’re starting from scratch with a new sink, installing a kitchen faucet is a relatively easy DIY project.
In this article, we’ll show you how to install a kitchen faucet in eight simple steps.
- Read the manufacturer’s instructions before you begin
- This will give you an idea of what tools you’ll need and how to go about the installation process
- Disconnect the water supply lines from the existing faucet
- You’ll need to turn off the water at the shutoff valves under the sink first
- Unscrew the mounting nuts that hold the faucet in place and remove it from the sink
- Clean up any old putty or sealant around the sink opening, then place your new faucet in position and mark where you’ll need to drill holes for mounting it in place
- Drill holes for your mounting hardware, then secure your new faucet in place according to the manufacturer’s instructions
- Be sure to use plumber’s putty or a similar sealant around all joints to prevent leaks
How to Install a Single Handle Kitchen Faucet With Sprayer?
If you’re looking to add a little more convenience to your kitchen, installing a single handle kitchen faucet with sprayer is a great option. It’s not as difficult as you might think, and in this post we’ll walk you through the entire process from start to finish. Before you begin, it’s important to make sure that you have all of the necessary tools and materials on hand.
You’ll need an adjustable wrench, pliers, a putty knife, Teflon tape, and some silicone caulk. Once you have everything gathered together, follow these steps: 1. Start by turning off the water supply to your sink.
There should be valves under the sink that you can turn to shut off the water flow. 2. Use an adjustable wrench to loosen and remove the old faucet fixture. Be careful not to damage any of the pipes as you do this.
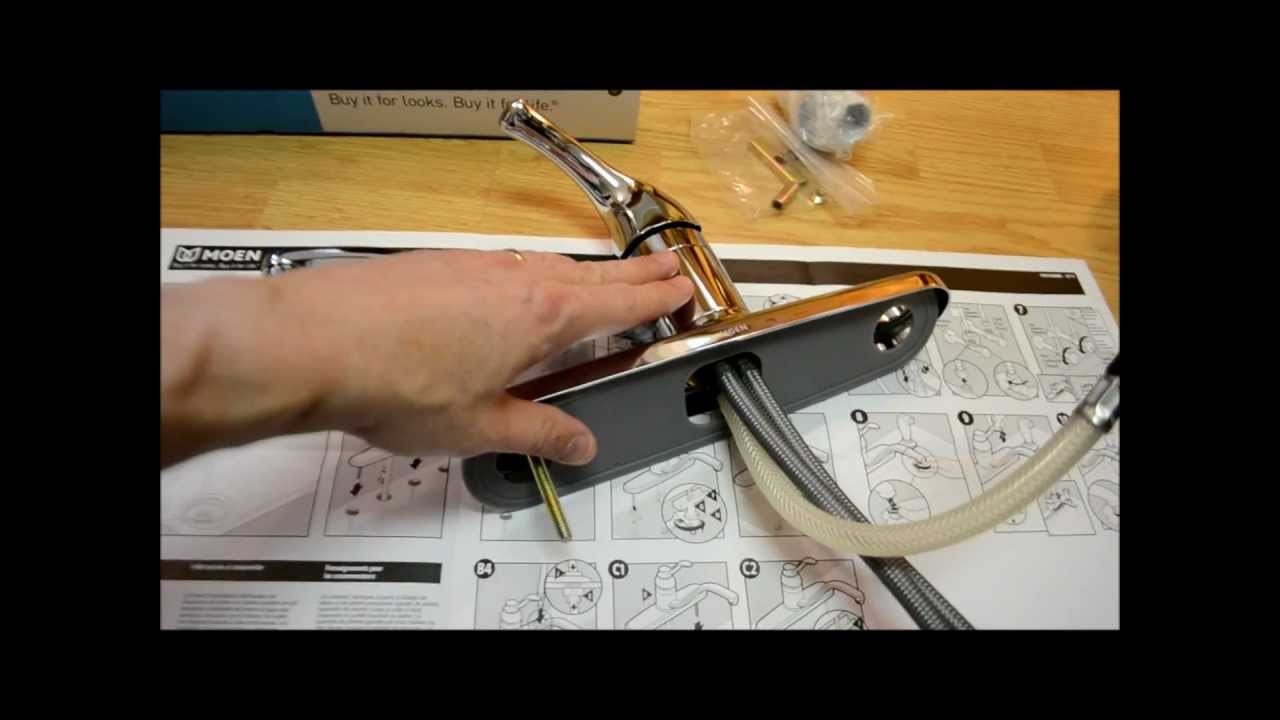
3. Take a look at the new faucet fixture and locate all of the parts that need to be attached (the base plate, hoses, etc.). If anything is missing or damaged, now is the time to get a replacement part before continuing with installation.
4 . Affix Teflon tape around all of the male threads on each of these parts (this will help create a seal so that no water leaks out). Then use your adjustable wrench to screw them into place (hand-tighten only – don’t overdo it!). Make sure that everything is nice and tight before moving on.
Tools Needed to Install Kitchen Faucet
Assuming you have a basic toolkit, the only other tools you will need to install a kitchen faucet are an adjustable wrench and pliers. If your faucet has separate hot and cold handles, start by attaching the flexible supply lines to the valves under the sink. Be sure to use the right line for each valve – hot on the left, cold on the right.
Use pliers to tighten the retaining nuts finger-tight, then another quarter turn with the wrench. Next, position the faucet assembly on top of the sink and secure it in place with mounting nuts. Again, tighten these finger-tight with pliers, then give them a final quarter turn with an adjustable wrench.
Finally, attach any additional components like sprayers or soap dispensers (if applicable). Once everything is in place, turn on the water valves slowly to check for leaks. If all is well, you’re done!
Home Depot How to Install a Kitchen Faucet?
Installing a kitchen faucet may seem like a daunting task, but with the help of The Home Depot it can be easy. Follow these steps to install your new kitchen faucet. 1. Before you begin, make sure you have all the tools and materials you will need.
This includes the new faucet, plumber’s putty, Teflon tape, an adjustable wrench and a Phillips head screwdriver. 2. Start by turning off the water to your sink. There are usually valves under the sink that control the water supply to each individual fixture.
Find the one for your kitchen sink and turn it clockwise until it is tight. 3. Next, use the adjustable wrench to remove the old faucet. Be careful not to damage any of the pipes as you do this.
If there is any plumber’s putty or Teflon tape on the threads of the pipes, be sure to remove it before proceeding. 4a). If your new faucet has one handle, then simply attach it to the hot water pipe using Teflon tape and tighten with an adjustable wrench until snug (do not over-tighten).
Then attach it to the cold water pipe in the same manner. Finally, hand-tighten each of the nuts under neath the sink basin onto their respective threaded posts on the under side of the mounting bracket for both handles.(Be careful not to tighten these too much or you may crack the porcelain around them.) 4b)If your new faucet has two handles—one for hot and one for cold water—then first attach both supply lines(hoses)to their appropriate valve son the wall behind the sink before proceeding with the installation of the mounting bracket and faucet on there in of the sink.
(To use Teflon tape on pipe fittings to avoid leaks later on.)Then simply follow step 4aabove to finishing stalling your new two handle kitchen faucet!
How to Install a Kitchen Faucet Without Using the Sprayer?
If you’re like most people, your kitchen faucet is one of the most used appliances in your home. And over time, it can start to show its age. If your faucet is starting to drip or leak, it’s probably time for a new one.
But before you call a plumber, consider replacing the faucet yourself. It’s actually not that difficult—and you don’t even need to use the sprayer! Here’s a step-by-step guide to installing a new kitchen faucet:
1. Turn off the water supply valves under the sink. Then open the faucet to release any remaining water pressure in the lines. 2. Use an adjustable wrench to remove the nuts that secure the hot and cold water supply lines to the underside of the old faucet.
If your old faucet has copper supply lines, be careful not to damage them when removing them from the valves. 3a. For deck-mounted (above-sink) faucets: Unscrew and remove any mounting hardware that secures the old faucet body to the sink or countertop surface.
Some models will have screws on top of the escutcheon plate (the round metal plate behind the handle), while others will have screws underneath (accessible from below). Be sure to save all hardware so you can use it with your new faucet! 3b For wall-mounted (below-sink) Faucets: Using an adjustable wrench, loosen and remove retaining nuts that hold both handles in place as well as any setscrews or bolts securing The spout To The wall bracket .
With The retaining Nuts removed , pull gently on each handle until it comes free from its mounting base . Next , grasp The spout firmly And pull straight out from The wall . You may need To wiggle It slightly As You pull , but be careful Not TO damage The finish On Your sink Or countertop .
Again , save All hardware So That You Can reuse IT With Your New Fixture .
How to Replace Kitchen Faucet Head?
If your kitchen faucet is leaking or not working properly, it may be time to replace the head. Luckily, this is a relatively easy fix that you can do yourself in just a few minutes. Here’s how:
1. Shut off the water supply to your kitchen sink. This is typically done by turning the valves under the sink clockwise until they’re tight. 2. Place a bucket underneath the faucet to catch any water that may drip out when you remove the old faucet head.
3. Use a wrench to loosen and remove the retaining nut that holds the faucet head in place. In some cases, you may need to use pliers to remove this nut. 4. Pull off the old faucet head and discard it (or save it if you think you might be able to reuse it).
5. Take your new faucet head and screw it onto the water supply line in its place. Make sure it’s screwed on tightly so there are no leaks. 6. Turn on the water supply and test out your new faucet head!
Credit: www.youtube.com
Can I Install a Kitchen Faucet Myself?
Assuming you have basic plumbing knowledge and tools, the answer is yes! Here is a step-by-step guide to help you through the process: 1. Turn off the water supply to your sink.
There will be two valves beneath the sink – one for hot water and one for cold. Turn both of these valves clockwise to shut them off.
2. Place a towel or bucket underneath the faucet supply lines to catch any water that may drip out when you disconnect them.
3. Use an adjustable wrench to loosen and remove the nuts that secure the flexible supply lines to the shutoff valves. If your faucet has rigid supply lines, use a hacksaw to cut through them before removal.
4. Unscrew and remove the mounting nuts that hold the old faucet in place. You may need pliers or an Allen wrench to do this, depending on your particular model of faucet. Gently pull the old faucet away from the sink and dispose of it (or set it aside if you plan on reusing it).
5A. If your new faucet has rigid supply lines: measure, cut and solder new pieces of pipe (of matching diameter) to fit between the shutoff valves and the inlets on the back of then conceitedness installed.. Rigid lines are typically made of copper and require special skills and equipment to work with; if you’re not confident tin your abilities, you may want to hire a plumber for this portion of then installation.
5B .If your new faucet has flexible supply lines attached to the underside of the unit: use the sense adoring to make your own rigid ones. Flexible supply lines are much easier to work with and don’t require soldering or special tools– they simply screw on/off(hand-tight engines usually sufficient). Be sure to correctly match the new fittings to maintain proper water flow (ie: don’t mix metals– connect brass t brass , copper to bronze/copper etc).
6 . Now it’s time too install the new faucet! Line up the new unit with he holes in the sink and secure it in place using the nuts provided in the new kit..Tight an the se in place using pliers or an alien wren ch until thulium stops dripping out from under neath entirely. Now turn on the water supply valve sot check for tips in gibe fore continuing on to your next project!
Can I Install a Faucet on My Own?
If you have some basic plumbing skills, then you should be able to install a faucet on your own. The first thing you need to do is turn off the water supply to the sink. Then, remove the old faucet and clean up any debris or buildup that may be on the sink.
Next, apply plumber’s putty around the base of the new faucet and attach it to the sink. Once the faucet is in place, reconnect the water lines and turn on the water supply. Finally, test out your new faucet to make sure everything is working properly.
Do You Need Plumbers Putty to Install Kitchen Faucet?
When it comes to kitchen faucets, there are a few different types of installation that you might need plumbers putty for. If your faucet has a base plate that needs to be attached to the sink, then you will definitely need to use plumbers putty in order to seal the deal and keep any water from leaking out. In addition, if your faucet has any type of threaded fittings, such as on the sprayer hose or supply lines, then using plumbers putty can help create a waterproof seal so that again, no water leaks occur.
So overall, while you might not *always* need plumbers putty when installing a kitchen faucet, it’s always better to err on the side of caution – especially since this is typically a pretty inexpensive product! – and go ahead and use it. That way you can rest assured knowing that your new kitchen faucet is properly sealed and won’t cause any unwanted leaks.
How Do You Install a Kitchen Faucet?
Assuming you have all the necessary tools, parts and know-how, installing a kitchen faucet is actually a pretty easy job. The first thing you need to do is turn off the water supply to your sink. There will be two valves under your sink – one for hot water and one for cold.
Turn both of these valves clockwise to shut them off. Now it’s time to remove your old faucet. Unscrew the mounting nuts that hold the faucet in place (there will usually be two of them).
You may need a wrench or pliers to get these loose. With the nuts removed, you should be able to pull the faucet out from above the sink. If it’s stuck, you may need to use a putty knife to pry it loose.
Now take a look at your new faucet and make sure all the parts are there. Most kits will come with detailed instructions on how to assemble everything – follow these carefully. Once everything is together, it’s time to start attaching things back under the sink.
First, slip the base plate over the holes in your sink and secure it with screws (usually included in the kit). Next, thread the supply lines (attached to hot and cold) through this base plate and screw them onto their respective valves below. Now you can attach your new faucet by lining up its mounting holes with those in the base plate – again using screws provided in most kits.
Finally, turn on both valves slowly until water starts flowing through your new faucet! Give everything a once over (including underneath your sink) for any leaks or drips and tighten any connections that may be leaking before using as normal.
Conclusion
Installing a kitchen faucet is a relatively easy task that most homeowners can do without professional help. The first step is to turn off the water supply to the sink and then remove the old faucet. Next, you’ll need to install the new faucet by following the manufacturer’s instructions.
Once the new faucet is in place, turn on the water supply and test out your handiwork!