Connect Wireless Security Camera To Wifi: Easy Setup Guide

To connect a wireless security camera to WiFi, follow the manufacturer’s instructions and use the companion app. Ensure the camera is within range of the router.
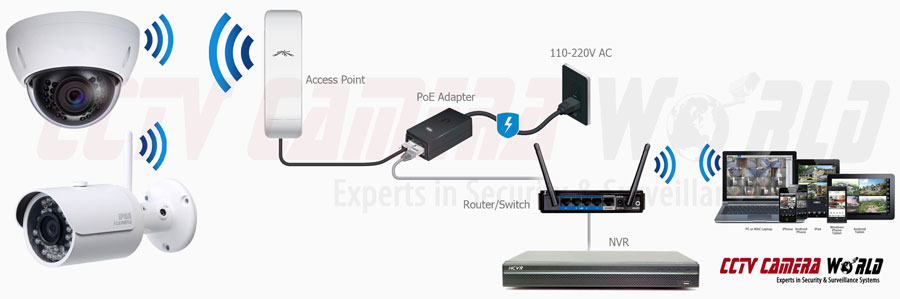
Wireless security cameras offer flexibility and convenience for home and business surveillance. These cameras can be easily installed in various locations by eliminating the need for extensive wiring. Connecting your camera to WiFi enables remote access, live streaming, and motion alerts directly to your smartphone.
Choose a camera compatible with your existing WiFi network to ensure seamless integration. Always refer to the user manual for specific setup steps, as different models may have unique requirements. Reliable internet connectivity is essential for optimal performance and uninterrupted monitoring. This connection enhances security and provides peace of mind.
Credit: www.cctvcameraworld.com
Introduction To Wireless Security Cameras
Wireless security cameras have become a vital part of home and office security. These cameras are easy to install and offer great flexibility. Connecting them to WiFi makes them even more efficient. They provide real-time monitoring and instant alerts.
Rising Popularity Of Wireless Solutions
The popularity of wireless security cameras is on the rise. Many people prefer these solutions over traditional wired systems. Wireless cameras are easy to install and require no complex wiring. They can be placed anywhere within the WiFi range.
Below is a table comparing wired and wireless security cameras:
| Feature | Wired Cameras | Wireless Cameras |
|---|---|---|
| Installation | Complex | Simple |
| Flexibility | Limited | High |
| Maintenance | More | Less |
Benefits Of Having Wireless Security
Wireless security cameras offer several benefits:
- Easy Installation: No need for complex wiring.
- Remote Access: View footage from anywhere using a smartphone.
- Flexibility: Place cameras in various locations.
- Instant Alerts: Receive notifications on your phone.
These benefits make wireless security cameras a smart choice. They provide peace of mind and ensure safety.
Essential Equipment Checklist
Setting up a wireless security camera at home is easy. It would help to have the right equipment to ensure a smooth installation. Follow this checklist to make sure you have everything you need.
Choosing The Right Wireless Camera
First, choose a wireless camera that fits your needs. Look for features like HD quality, night vision, and motion detection. These features help you keep an eye on your property day and night.
| Feature | Description |
|---|---|
| HD Quality | Provides clear video footage |
| Night Vision | Allows monitoring in the dark |
| Motion Detection | Sends alerts for any movement |
Tools Needed For Installation
Gather these tools before starting the installation:
- Screwdriver
- Drill
- Mounting brackets
- Power cables
- WiFi router
Use a screwdriver to secure the camera in place. A drill helps to make holes for mounting brackets. Power cables ensure your camera stays powered. A strong WiFi router ensures a stable connection.
Pre-installation Steps
Before installing your wireless security camera, follow these per-installation steps. These steps ensure your camera functions well and connects easily to your WiFi network.
Selecting The Ideal Location
Choose a spot with a clear view of the area you want to monitor. Avoid placing the camera where it can be easily tampered with. Ensure the camera is within the range of your WiFi router.
Think about the lighting at different times of the day. The location should have good lighting for clear footage. Keep in mind any obstacles that might block the camera’s view.
Here is a quick checklist for selecting the ideal location:
- Clear view of the monitoring area
- Out of reach from tampering
- Within WiFi range
- Good lighting conditions
- No obstacles blocking the view
Securing Your Wifi Network
Make sure your WiFi network is secure. Use a strong password to protect it. Change your default router settings to enhance security. Enable WPA3 encryption if available on your router.
Here are some tips to secure your WiFi network:
- Use a strong, unique password.
- Update your router firmware regularly.
- Disable remote management features.
- Use WPA3 encryption if available.
- Keep a separate network for guests.
Securing your WiFi network ensures your camera remains safe from hackers. These steps help protect your privacy and data.
Step-by-step Camera Setup
Setting up your wireless security camera can be simple. Follow these steps to ensure your camera connects to WiFi smoothly. This guide will help you mount, power, and connect your camera. Let’s dive in!
Mounting Your Camera
First, choose a suitable location for your camera. It should cover the area you want to monitor. Make sure the spot has a good WiFi signal.
- Use a sturdy surface for mounting.
- Ensure the camera is protected from weather if outdoors.
- Avoid direct sunlight to prevent glare.
Next, gather your mounting tools. Most cameras come with a mounting kit. You will need screws and a drill. Follow these steps:
- Mark the spots for the screws using the camera bracket.
- Drill holes into the marks.
- Secure the bracket with screws.
- Attach the camera to the bracket.
Powering The Camera
Now, let’s power your camera. Depending on the model, your camera may use batteries or an AC adapter.
- Battery-Powered Cameras: Insert fresh batteries into the camera. Ensure they are correctly aligned.
- AC-Powered Cameras: Plug the adapter into a power outlet. Connect the other end to the camera.
Once powered, the camera should light up. This means it’s ready to connect to WiFi.
Follow these simple steps, and you’ll have your camera set up in no time. Enjoy the peace of mind that comes with a secure home.
Connecting To Wifi
Connecting your wireless security camera to WiFi is essential for remote monitoring. This guide will help you do it step by step. Follow these instructions to ensure your camera stays connected.
Accessing The Camera Interface
First, you need to access the camera interface. Usually, this involves typing the camera’s IP address into your web browser. You can find this address in the camera’s manual.
- Open your web browser.
- Enter the camera’s IP address.
- Log in using the default username and password.
Tip: Change the default password for better security.
Network Configuration And Settings
Once you’re logged in, navigate to the network settings. This is where you will connect your camera to your WiFi network.
| Step | Action |
|---|---|
| 1 | Go to the network settings menu. |
| 2 | Select your WiFi network from the list. |
| 3 | Enter your WiFi password. |
| 4 | Save the settings and restart the camera. |
Note: Ensure your WiFi signal is strong where the camera is installed.
By following these steps, your camera will connect to your WiFi network. This allows you to monitor your home or office remotely. Enjoy the added security and peace of mind.
Credit: www.cctvcameraworld.com
Troubleshooting Common Issues
Connecting your wireless security camera to WiFi can sometimes be tricky. Troubleshooting common issues can save you time and frustration. Here, we’ll focus on two major problems you might face: WiFi signal interference and the camera not connecting.
Wifi Signal Interference
WiFi signal interference can disrupt your camera’s connection. Check for physical obstacles like walls or furniture between the camera and the router. Metal objects and thick walls can block signals.
Another common issue is interference from other devices. Devices like microwaves, cordless phones, and baby monitors can interfere with the WiFi signal. Keep these devices away from your camera and router.
| Interference Source | Solution |
|---|---|
| Walls and Furniture | Move objects away from the router and camera. |
| Other Electronic Devices | Keep devices like microwaves and baby monitors away. |
Camera Not Connecting
If your camera is not connecting, start by checking the WiFi password. Ensure the password is correct.
Next, reboot your router and camera. Sometimes a simple reboot can solve connectivity issues.
- Turn off your router and wait for 30 seconds.
- Turn it back on and wait for it to fully restart.
- Reboot your security camera.
Check the camera’s firmware. Outdated firmware can cause connectivity problems. Visit the manufacturer’s website for updates.
Ensure your router supports the camera’s frequency. Some cameras only work on the 2.4 GHz band. Verify your router’s settings to support this.
With these tips, you can resolve many common issues. Troubleshooting doesn’t have to be hard.
Securing Your Camera Network
Ensuring the safety of your wireless security camera network is crucial. Unsecured cameras are vulnerable to hacking and unauthorized access. This can compromise your privacy and security. Below are essential steps to secure your camera network.
Setting Strong Passwords
Always use strong passwords for your wireless security cameras. A strong password includes a mix of letters, numbers, and special characters.
- Avoid using common words or easily guessable information like your name or birthdate.
- Change default passwords immediately. Default passwords are easy to find and hack.
- Use a unique password for each camera to add an extra layer of security.
Regular Firmware Updates
Keep your camera’s firmware updated. Manufacturers release updates to fix security vulnerabilities and improve functionality.
- Check for updates regularly. Set a reminder to check for firmware updates monthly.
- Enable automatic updates if available. This ensures your camera always runs the latest software.
- Follow the manufacturer’s instructions for updating firmware. Incorrect updates can cause issues.
Regular updates help protect your camera from new security threats.
By following these steps, you can significantly improve the security of your wireless security camera network.
Credit: www.cctvcameraworld.com
Maximizing Camera Performance
Maximizing Camera Performance is crucial for ensuring that your wireless security camera operates at its best. Proper setup and ongoing maintenance can significantly enhance your camera’s capabilities. This section will explore ways to get the most out of your camera.
Optimizing Placement For Coverage
Where you place your camera can make a big difference. Follow these tips to optimize placement:
- Height: Mount your camera 8-10 feet above the ground.
- Angles: Position your camera to cover entry points.
- Obstructions: Avoid placing the camera behind trees or walls.
- Lighting: Ensure good lighting conditions for better image quality.
Use the camera’s field of view to your advantage. A wide-angle lens can cover more area. Position your camera to maximize its range without any blind spots.
Maintaining Your Camera
Regular maintenance is key to keeping your camera in top shape. Here are some steps:
- Cleaning: Wipe the lens regularly to remove dirt and dust.
- Firmware Updates: Keep your camera’s firmware up to date for new features and security patches.
- Battery Check: If your camera is battery-operated, check the battery level frequently.
- Network Connection: Ensure your camera is always connected to your WiFi network.
Maintaining your camera extends its lifespan and ensures it functions properly. Regular updates and checks keep it reliable.
| Task | Frequency |
|---|---|
| Clean the lens | Once a month |
| Update firmware | As updates are available |
| Check battery | Weekly |
| Test network connection | Weekly |
Advanced Setup Options
Setting up your wireless security camera to WiFi opens up a world of advanced setup options. These options can make your security system more efficient and user-friendly. Below, we explore two key advanced setup options.
Integrating With Smart Home Systems
Integrating your security camera with smart home systems can greatly enhance functionality. This integration allows you to control the camera through voice commands.
Popular smart home systems include:
- Amazon Alexa
- Google Home
- Apple HomeKit
To integrate, follow these steps:
- Open your smart home app.
- Select the option to add a new device.
- Choose your camera’s brand and model.
- Follow the on-screen instructions to complete the setup.
Integration enables features like motion alerts, live video feeds, and even automated routines.
Using Multiple Cameras
Using multiple cameras provides broader coverage of your property. This setup ensures no blind spots and offers increased security.
Here are some tips for setting up multiple cameras:
- Place cameras at entry points and high-traffic areas.
- Ensure each camera connects to the same WiFi network.
- Use the camera app to manage and view all cameras from one interface.
A table below shows the ideal camera placement:
| Location | Camera Type |
|---|---|
| Front Door | Doorbell Camera |
| Backyard | Outdoor Camera |
| Living Room | Indoor Camera |
Using multiple cameras ensures comprehensive surveillance. This setup maximizes your home’s security and gives you peace of mind.
Frequently Asked Questions
How Do I Connect My Wireless Camera To My Home Wi-fi?
To connect your wireless camera to your home Wi-Fi, power it on. Open the camera’s app, select Wi-Fi setup, and follow prompts. Ensure your Wi-Fi network and password are correct. Complete the setup in the app. Your camera should now be connected.
How Do I Reconnect My Outdoor Camera To Wi-fi?
To reconnect your outdoor camera to Wi-Fi, reset the camera. Open the app, select your camera, and follow the setup instructions. Ensure your Wi-Fi network is stable and the password is correct.
Why Won’t My Security Camera Connect To My Wi-fi?
Your security camera might not connect due to incorrect Wi-Fi password, weak signal, or compatibility issues. Check settings and reboot devices.
Do Wireless Cameras Need To Be Connected To Wi-fi?
Yes, most wireless cameras need Wi-Fi for remote access and cloud storage. Some models offer local storage options.
How Do I Connect My Wireless Camera To Wifi?
First, power on the camera. Open the camera’s app, select WiFi settings, and follow the prompts to connect.
Conclusion
Connecting your wireless security camera to WiFi enhances home security and peace of mind. Follow the steps carefully for a seamless setup. Ensure your network is stable and secure. Proper installation helps you monitor your property effectively. Stay vigilant and keep your loved ones safe with a reliable WiFi-connected security camera.